What is a Bulk Data Pipeline (BDP)?
BDP is one of the types of data pipelines that Dextrus comes with. As the name suggests, it is used to transfer data from multiple tables in a single stretch from source platform to target platform.
What are the typical use cases of BDP?
Re-platforming: For example, if the IT organizations decide to move their hosting platform from on-premise to Cloud, it is inevitable to migrate/transfer the data from legacy RDBMSs to modern cloud databases like Snowflake, Azure SQL, Redshift, Big Query.
Mergers and Acquisitions: When systems merge or split due to mergers and acquisitions, lot of data movement happens
Fresh implementation of data warehousing: When CIO organizations decide to implement data warehousing solution for analytical reporting, it becomes necessary to migrate historical data from the source ERP systems into the staging layer of the data warehouse
How often a BDP is run, usually?
Usually, if everything goes fine, migration of data using BDP is run once. It is a one-time activity.
Tips to improve efficiency of data migration activity using BDPs?
The performance of the BDP depends on the size of the table. With Packetization and Parallelism features in place, large amounts of data are migrated quickly.
What are the steps involved in creating a BDP?
- Choose the source connection
- Choose the source database or schema or tables or a table
- Choose the target connection
- Choose the target schema
- Choose the right packetization for better performance (Optional)
- Choose the prefix/suffix, in case, to save the tables in different name (Optional)
- Start the process of data migration
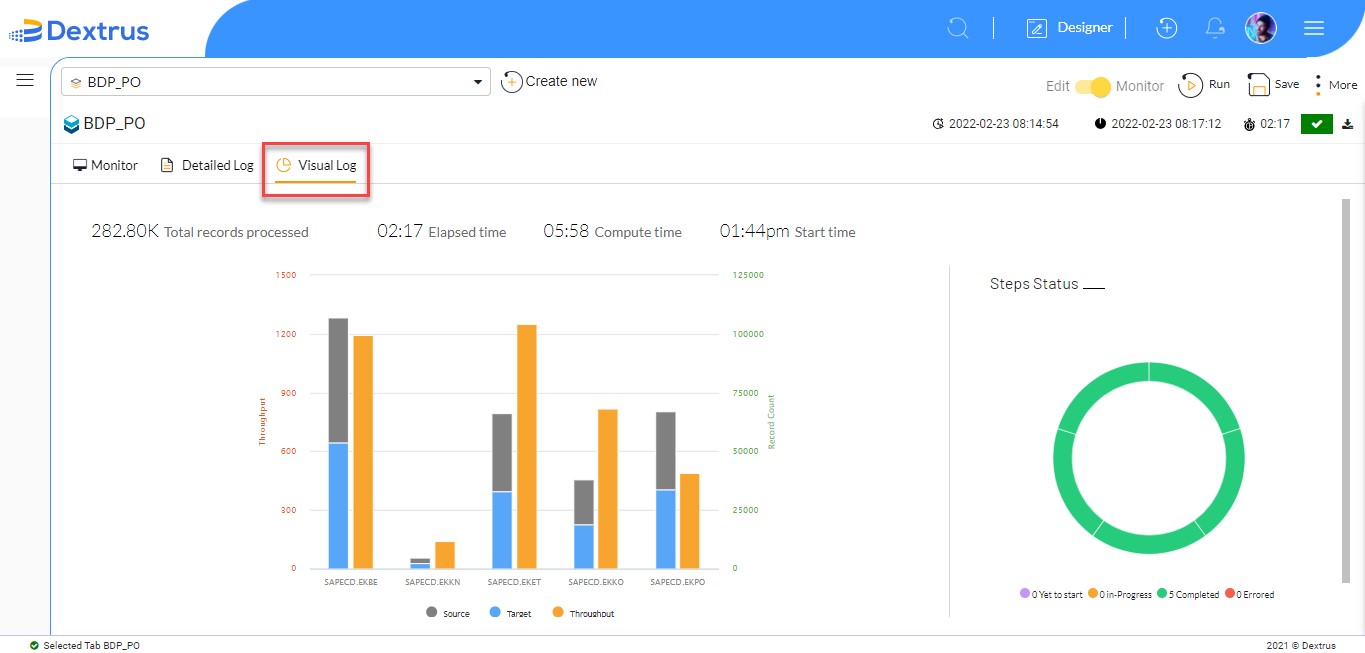
- Watch and analyze the detailed logs and visual logs
Sample Use case:
In the example below, it is clearly explained how to migrate procurement data from the SAP S4HANA system to the staging layer of the SQL Server.
How to create a BDP?
- Login to the Dextrus application with the provided credentials.
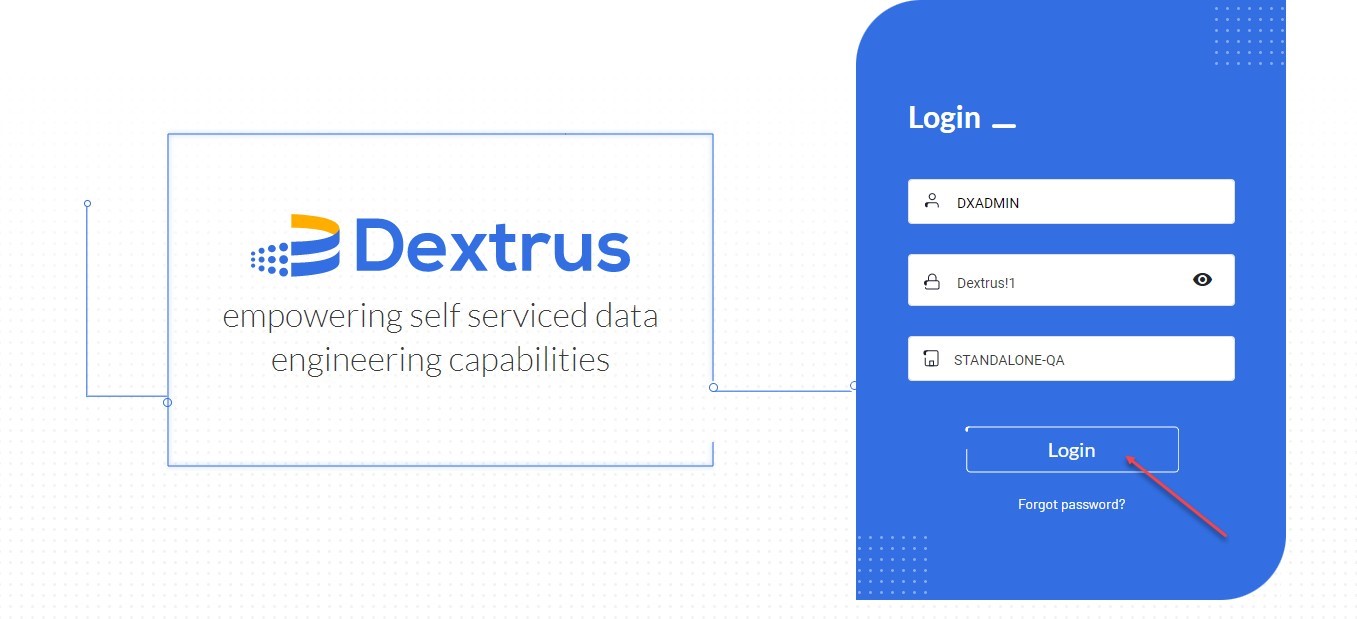
- Click the Login button.
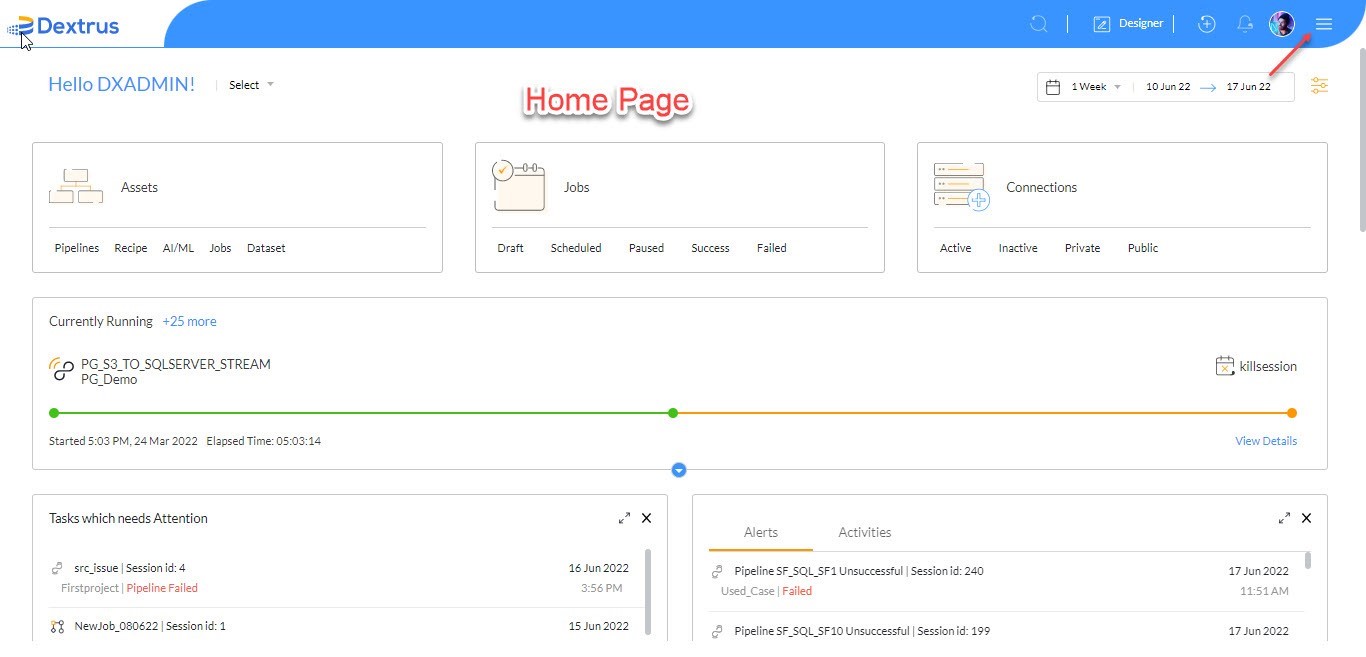
- Once the application authenticates the user credentials. Dextrus home page is displayed.
- Click the Designer option on the home page or else click the Pipeline Designer from the hamburger menu.
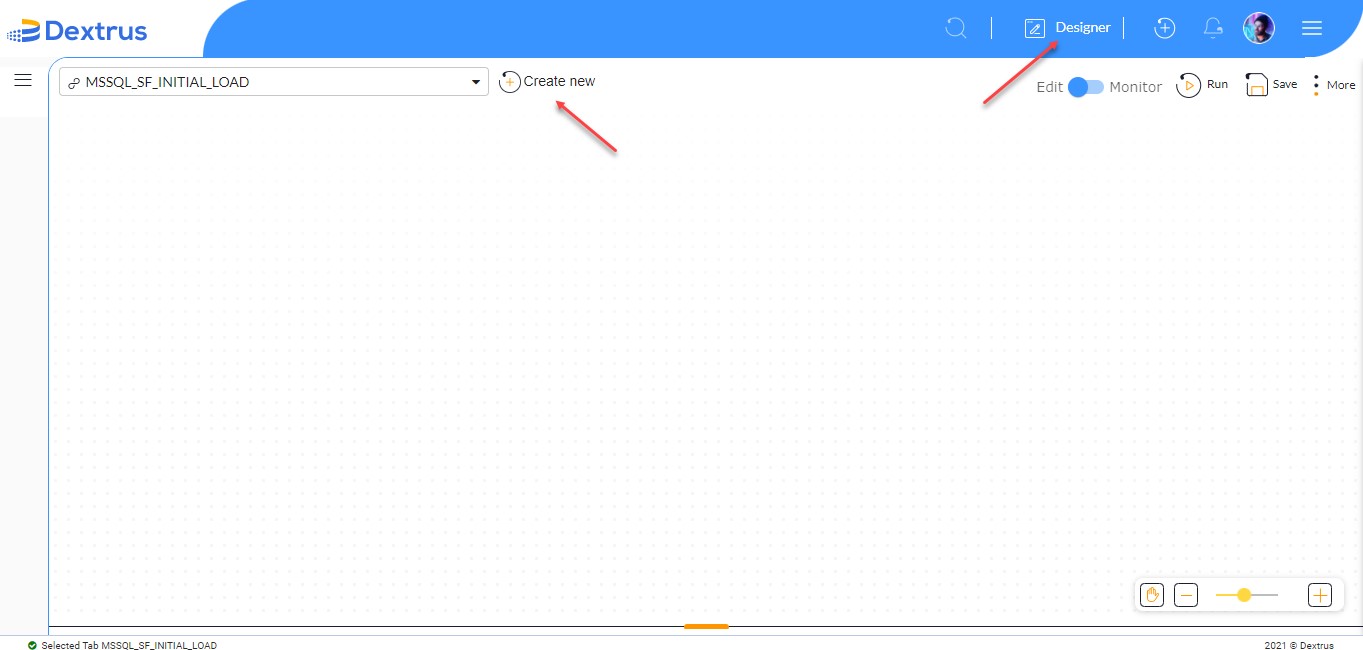
- Now, you land on the Designer page of the Dextrus application where you can create a Pipeline of your choice.
- Click ‘+ Create new’ button beside the drop-down list.
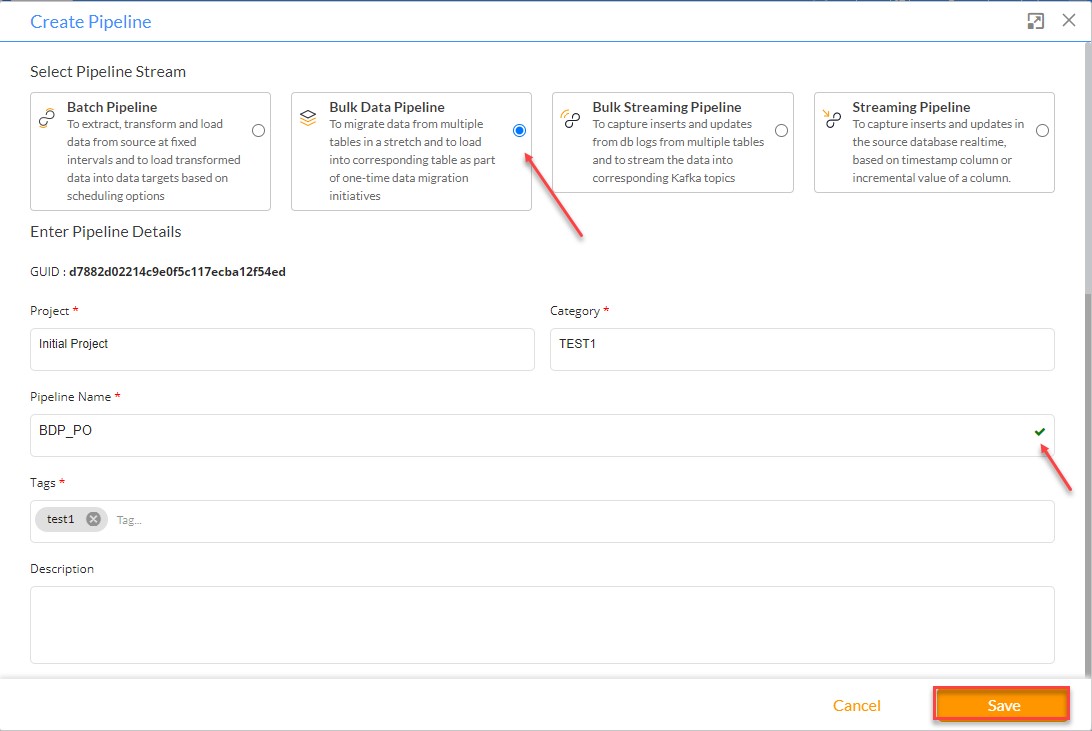
- A Create Pipeline pop-up window is displayed.
- Select the Bulk Data Pipeline radio button.
- Enter Pipeline Details, by typing Project, Category, Pipeline Name, Tags, and Description details in their respective text fields.
Note: Make sure you fill in all the Pipeline details since asterisk-marked fields are mandatory to be filled in to proceed further. The Description text field is optional.
- Click the Save button to save the Pipeline details.
- A green color tick mark status is displayed in the Pipeline Name text field indicating the pipeline name is available for use.
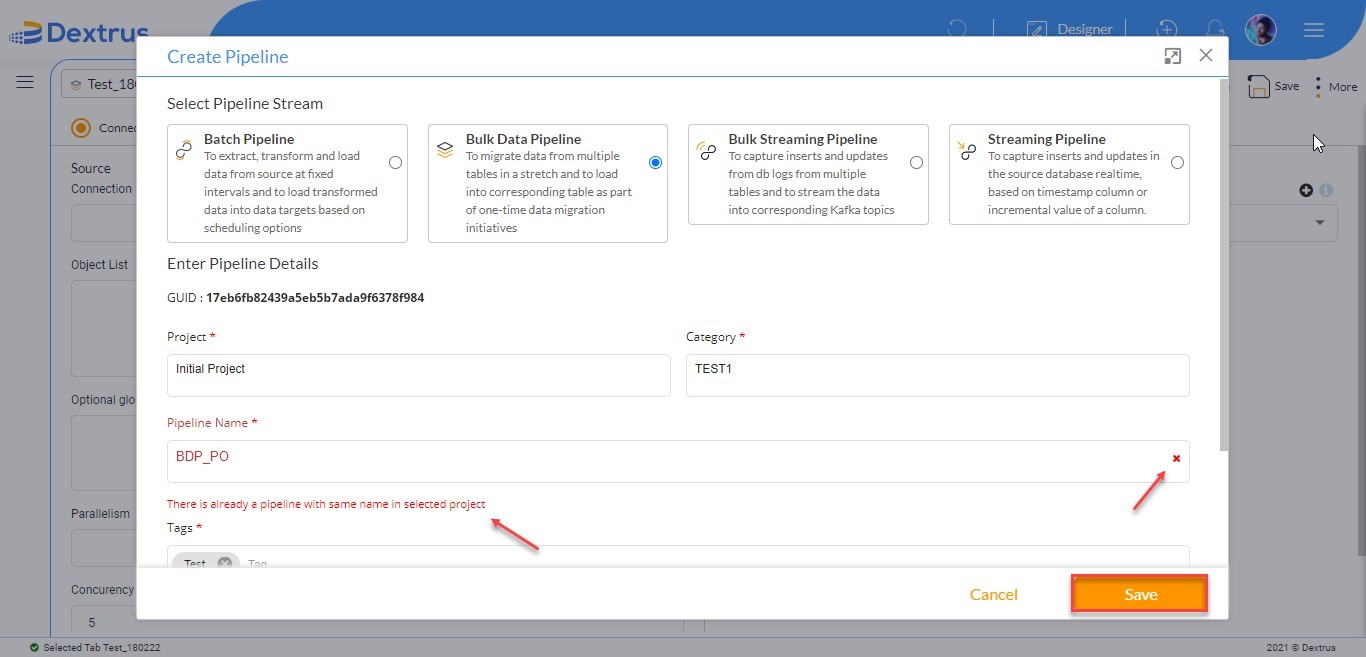
- In case you type an existing pipeline name, a warning message appears as "There is already a pipeline with the same name in the selected project".
- A red color cross mark status is displayedinthePipelineNametextfieldindicatingthepipelinenameisnot available for use.
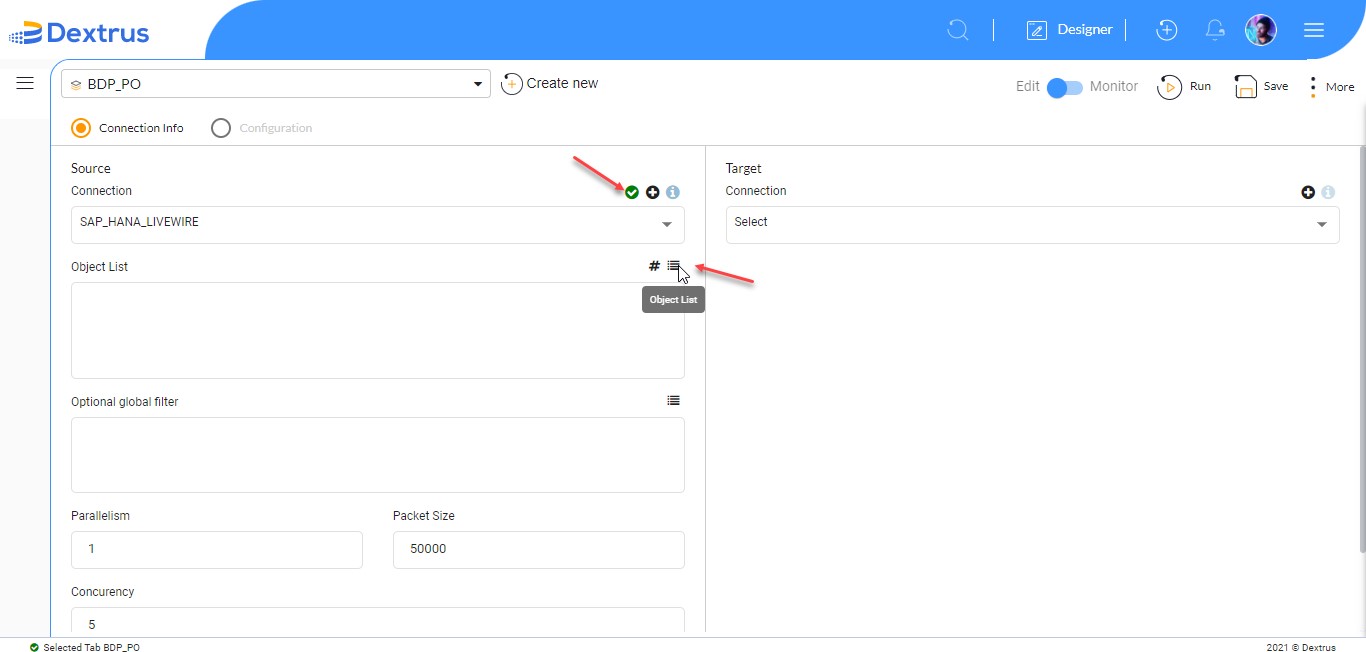
- The Bulk Data Pipeline (BDP) Connection Info screen is displayed. Where the Connection Info radio button is selected by default.
- The Connection Info screen is partitioned into Source and Target sections.
- Select the SAP_HANA_LIVEWIRE connection name from the Source Connection drop-down list.
- A green color tick mark appears if the selected connection name is active.
Note: You can hover on the icons to know their naming convention.
- Click the Object List icon to select tables of the selected connection.
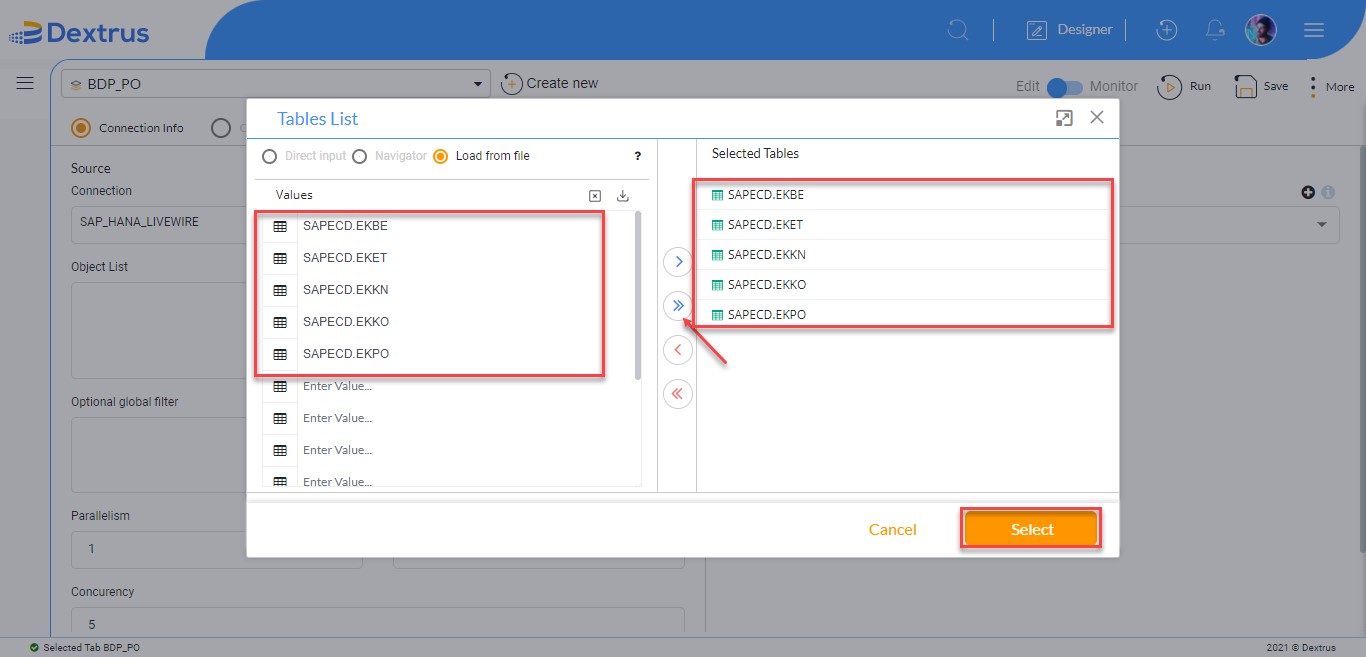
- A Tables List pop-up window is displayed, where Direct Input, Navigator, and Load from file radio buttons are available.
Note: In our use case we are considering the Load from file option to load tables.
- Select the Load from the file radio button.
- Click the Import from file icon to browse and import tables from the selected notepad file.
- Click the ‘>>’ icon to select all tables and move them to the right side pane section under 'Selected Tables'.
Note: You can either select the '>' icon to only move selected tables. Moreover, the '<' icon can be used to unselect only the required tables, and the '<<' icon is used to unselect all tables and move them back to the Values section.
- Click the Select button to confirm the selected tables.
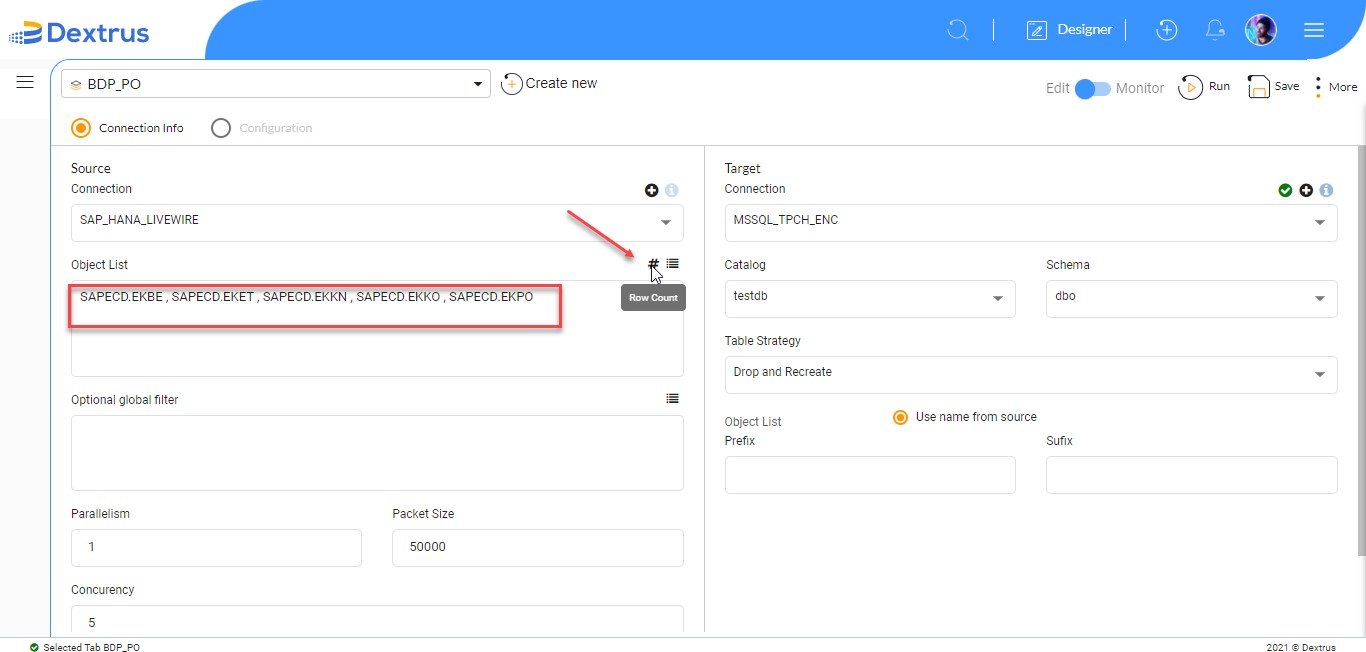
- The selected tables are displayed in the Object List text box.
- Click the Row Count icon beside the Object List icon to view the individual row count of each table.
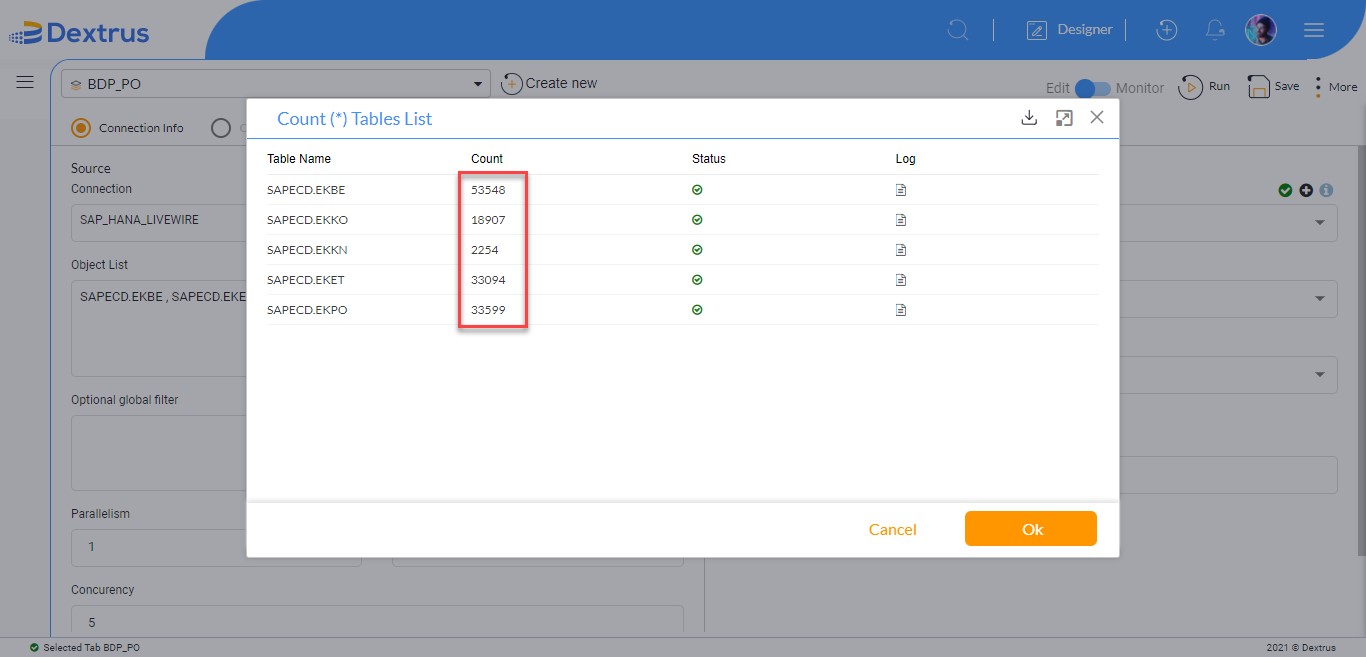
- A Count (*) Tables List pop-up window is displayed. The count of each table is displayed under the Count column.
- Click the Ok button to close the pop-up window.
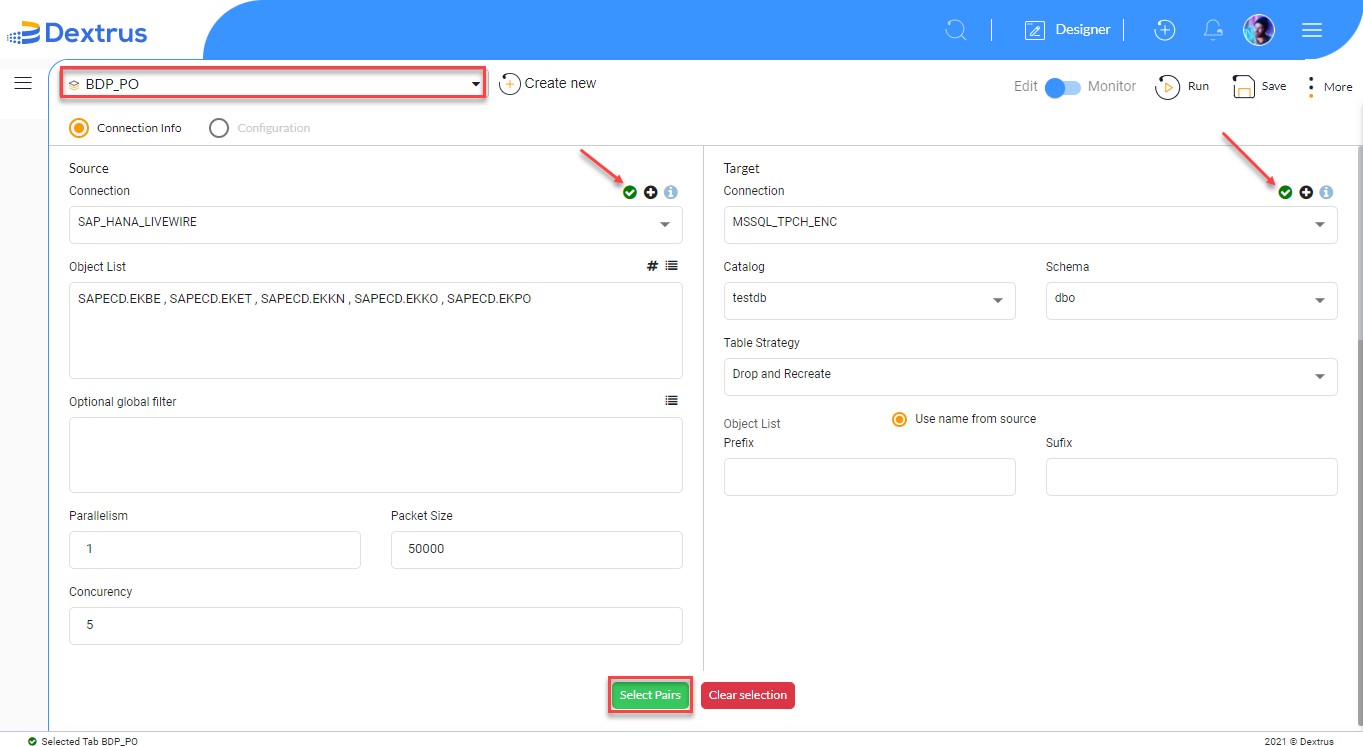
- In the Connection Info screen, you need to fill in Parallelism, Packet Size, and Concurency fields under the Source section.
Note: Default values are auto-populated for Parallelism, Packet Size, and Concurency fields.
- Select the 'MSSQL_TPCH_ENC' connection from the target connection drop-down list.
- Select the 'testdb' catalog option from the Catalog drop-down list.
- Select the 'dbo' schema option from the Schema drop-down list.
Note: A search box is provided to search for any required name as you open the drop-down list.
- Select the 'Drop and Recreate' table strategy option from the Table Strategy drop-down list.
Note: You can see four options namely Create, Append, Truncate and Drop and Recreate under the Table Strategy drop-down list.
- The Use name from the source radio button is selected, by default.
- The Prefix and Sufix text fields are optional for you to specify.
Note: The Prefix and Sufix fields under Object List are provisioned to append a prefix and sufix text to the source Object List tables.
- Click the Select Pairs button to move ahead.
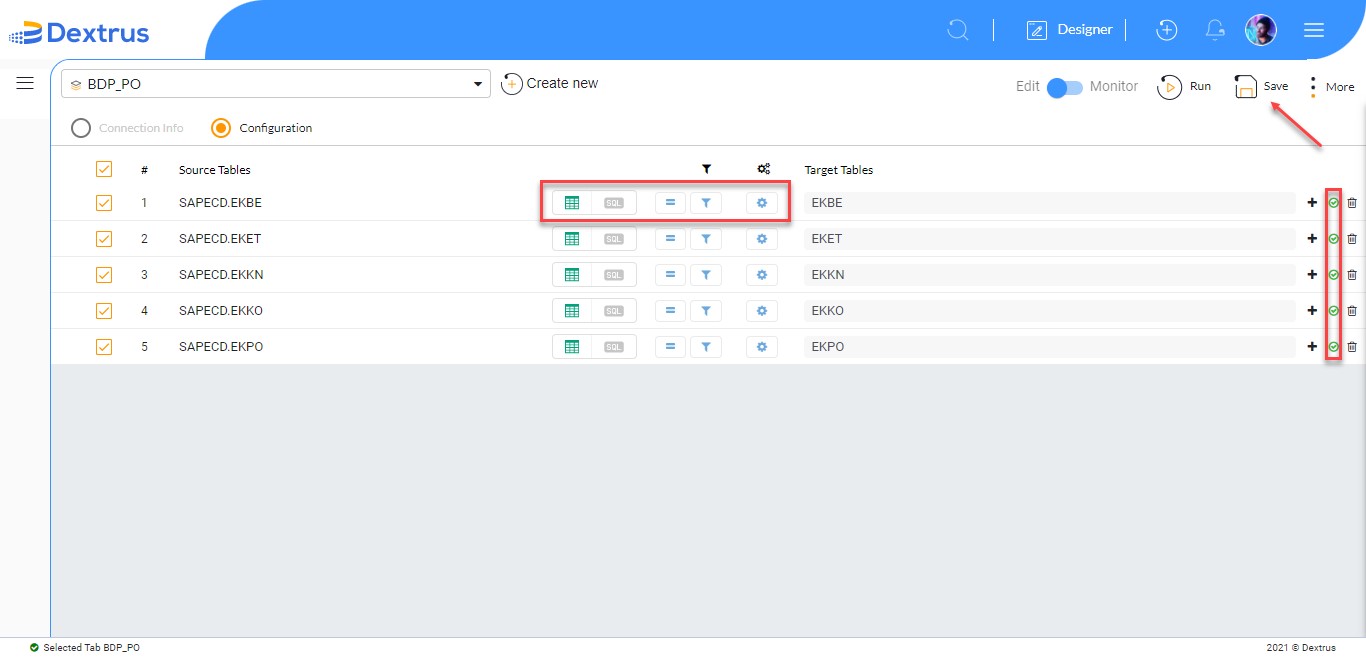
- The Configuration radio button is selected and the table details are displayed.
Note: The BDP configuration screen displays various components namely, Custom SQL, Local Filter, and Table Setting. Using Custom SQL and Local Filter you can refine the data as per your requirement. The Table Setting helps you to change the OutData type, Out Length, Out Precision, and other settings.
- The green color status against each table name indicates the source and target tables are configured properly.
Note: The Plus/Delete icons help you to add a new source table or delete an existing table.
- Click the Save button on the top right corner of the page to save the BDP settings again.
- A Save Pipeline pop-up window is displayed.
- Click the Save button on the Save Pipeline pop-up window.
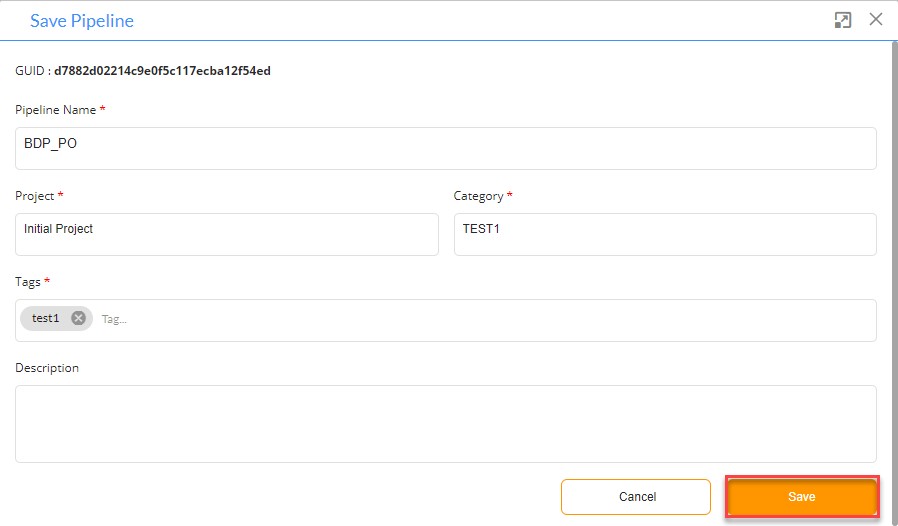
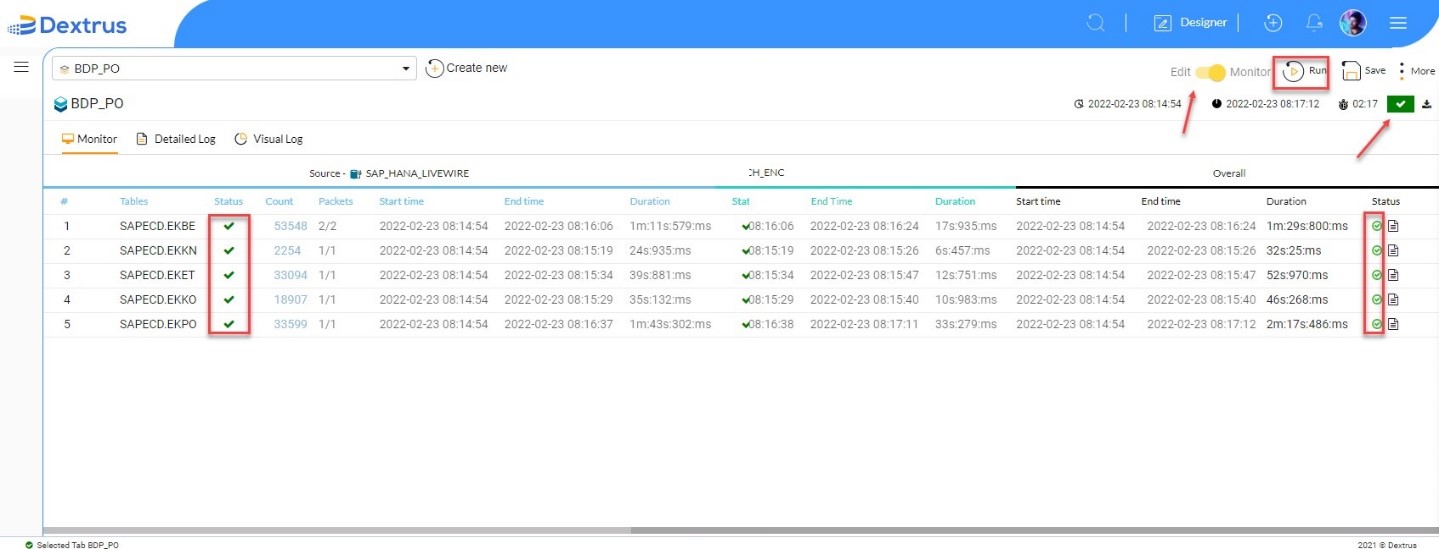
- Click the Run button beside the Save button to start the execution process.
Note: After you click the Run button the application goes to the Monitor mode, where you cannot make any changes in the pipeline. By default, the application is in the Edit mode where you can create and configure the pipeline as per your requirements.
- A white color tick mark within the green color box status is displayed to indicate the successful execution of the pipeline (BDP_PO).
- A green color circle with a tick mark against each table indicates the source tables are successfully loaded into the target system.
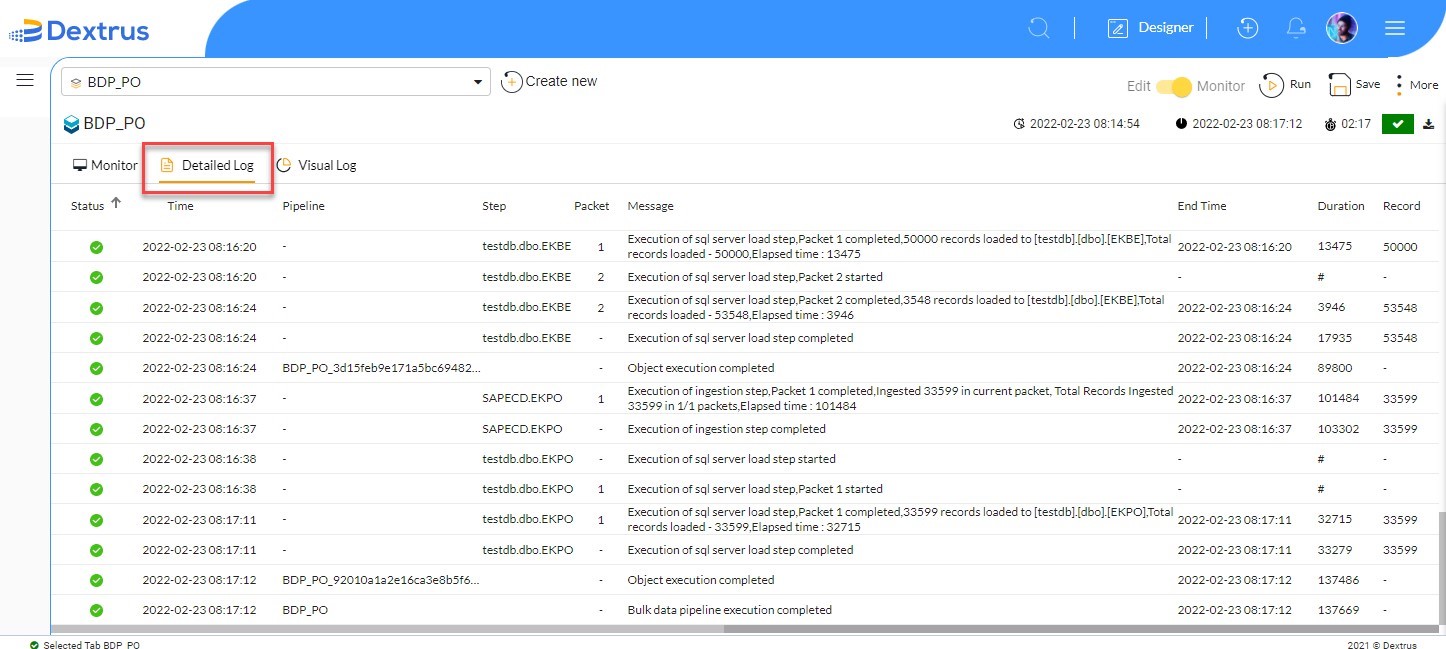
Note: By default, the Monitor tab is displayed. You can click the Detailed Log or Visual Log tabs for detailed information.
- Click the Detailed Log tab to get the detailed log information.
- Click the Visual Log tab to view generated logs information in the pictorial presentation.
Note: You can hover on the Bar graph and Steps Status to view specific table details.